आप जीमेल अकाउंट बनाते है तो उसकी पूरी जानकारी ना होने से या फिर अगर आप गूगल अकाउंट की पॉलिसी तोड़ते है तब भी आपका गूगल अकाउंट डिसेबल हो जाता है। गूगल अकाउंट डिसेबल होने के कुछ दिनों के अंदर आप फिर से अपना Google Account Recovery कर सकते है। यदि आपका अकाउंट भी डिसेबल हो गया है तो आज की पोस्ट में हम आपको बताने वाले है की Gmail Id Recovery Kaise KareMobile Se Blog Kaise Banate Hai? मोबाइल से ब्लॉग बनाकर पब्लिश करने के बेहद आसान तरीके!
आज सभी इंटरनेट यूज़र का अपना जीमेल अकाउंट होता है। जीमेल अकाउंट के द्वारा हम हमारे बहुत से ज़रुरी कार्य कर सकते है, लेकिन कभी हमारा जीमेल अकाउंट Deactivate या Locked हो जाता है तो हमे बहुत समस्या होती है। what is gmail in hindi अगर आपका जीमेल अकाउंट भी डिलीट हो गया है तो घबराने की जरुरत नहीं है what is gmail in hindi हम आपको आज की पोस्ट में जीमेल अकाउंट रिकवरी करना सिखाएँगे।How to open blocked websites easily PC & Mobile ? How to use VPN ? ब्लॉक की गई वेबसाइट को आसानी से कैसे खोलें
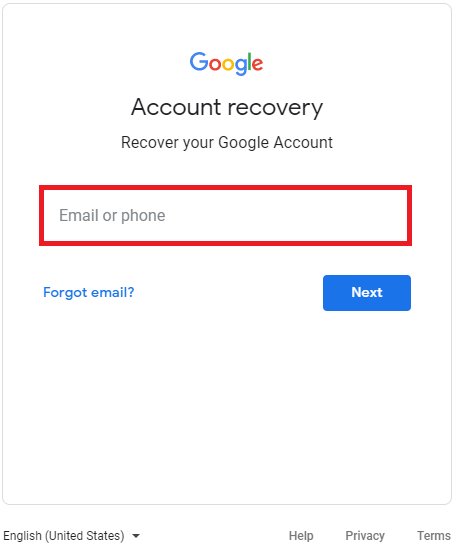
Google Account Recovery करने के लिए सबसे पहले “Google Account Recovery Page” पर जाकर अपने जीमेल अकाउंट से “Log In” करे।
Step 2: Enter the Email Address
“Enter Your Email Or Phone” के ऑप्शन में अपने उस जीमेल अकाउंट को Enter करे जिसे आप रिकवर करना चाहते है। जीमेल अकाउंट को Enter करने के बाद “Next” बटन पर क्लिक करे।
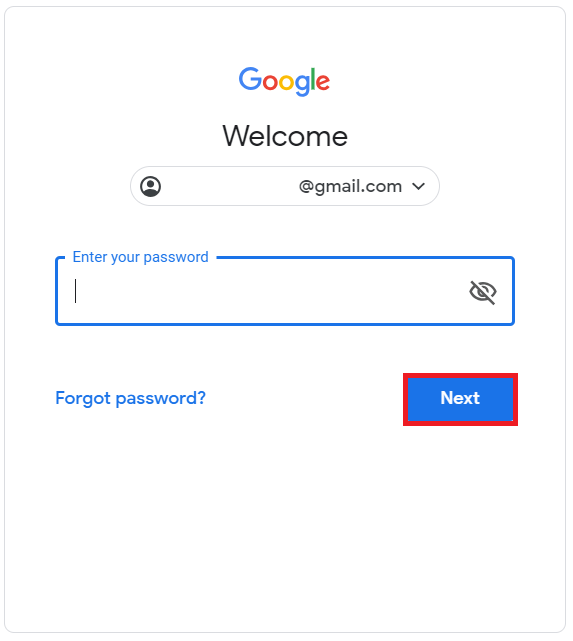
Step 3: Enter Your Password
Next Button पर क्लिक करने के बाद आपको अपना Purana Gmail Account का पासवर्ड Enter करना है।
पासवर्ड दर्ज करने के बाद “Continue” पर क्लिक कर दीजिए।
Step 4: Click Submit Button And Fill Form
अब आप अगले पेज पर Redirect हो जाएँगे। यहाँ पर आपको डिलीट अकाउंट की जानकारी मिलेगी जिसमें “Verify Your Identity” की लिंक मिलेगी इस पर क्लिक करे यदि आपको यह लिंक नहीं मिली है तो आपका अकाउंट Permanently Delete हो गया है।how to recover permanently deleted emails from gmail
Step 5: Verification Process
यह लिंक अगर आपको मिल जाती है how to recover permanently deleted emails from gmail तो आपको “Recovery Request Form” को पूरा भरना है और Verification की स्टेप्स को पूरा करना है।how to recover deleted gmail account
Step 6: Check Email
अपना Email ओपन करे यहाँ आपको एक मेल मिलेगा जिसमें रिकवर कोड आएगा।
अब नए पासवर्ड जनरेट करने के लिए एक लिंक आएगी उस पर क्लिक करे। Gmail Id Recover Password यानि की नए पासवर्ड जनरेट करना है।how to recover deleted gmail account
बस अब आप फिर से अपना Disabled मेल अकाउंट एक्सेस कर पाएँगे।
आप सभी ने ट्रेन में सफ़र तो किया ही होगा, irctc user id और यदि आपका जवाब हां है तो आप रेलवे स्टेशनों को भी बहुत अच्छे से जानते होंगे और वहां के माहौल को भी, रेलवे स्टेशनों पर बहुत ही ज्यादा भीड़ होती है, और सबसे ज्यादा भीड़ आपको टिकट काउंटर की लाइन में मिलती है। अक्सर हमारे साथ ऐसा होता है की हम कुछ ज़रुरी काम से कही बाहर जा रहे होते है, तो टिकट लेने के लिए हमे लंबी लाइनों में लगना पड़ता है। परन्तु भारी भीड़ होने के कारण हम समय पर टिकट नहीं ले पाते है और इस वजह से कई बार हमारी ट्रेन छूट जाती है।What is Jackfrut ,Jackfruit Benefits ,Uses and Side Effects in Hindi कटहल के 12 फायदे, उपयोग और नुकसान
लेकिन अब आपको टिकट लेने के लिए ना तो घंटो पहले प्लेटफार्म जाने की कोई ज़रूरत है ना ही लंबी लाइनों में खड़े रहने की। अब आप सोच रहे होंगे की बिना लाइन में लगे और स्टेशन गए टिकट कैसे लिया जा सकता है। यदि आप यह बात आज से कुछ सालों पहले सोचते तो शायद आप सही होते परन्तु अब यह सब मुमकिन है।भारत डिजिटल सेक्टर में दिन प्रतिदिन आगे बढ़ता ही जा रहा है। इसी में योगदान देते हुए भारतीय रेलवे ने एक ऐसी वेबसाइट तथा एप्लिकेशन बनाई है जिससे आपका समय और मेहनत दोनों बच जाएंगे। इसे आईआरटीसी अकाउंट के नाम से भी जाना जाता है। आज हम आपको इस पोस्ट के माध्यम से IRCTC Ke Bare Me Jankari प्रदान करेंगे और इस पर यूज़र आईडी बनाना भी बताएँगे कि IRCTC Ki Id Kaise BanayeFlipkart par Money kaise kamate hai ऑनलाइन फ्लिपकार्ट से पैसे कमाएं
IRCTC Kya Hai
हमारे देश में रेलवे टिकट IRCTC के द्वारा बुक किया जाता है। IRCTC हमे बिना किसी लाइन में खड़े हुए और बिना किसी परेशानी के आसानी से अपना टिकट ऑनलाइन बुक करने की सुविधा प्रदान करता है। कई बार हम किसी टिकट बुक करने वाले शॉप पर जाते है तो वह हमसे अतिरिक्त पैसे चार्ज करता है और हमारा दुकान तक जाने का समय भी बर्बाद होता है। लेकिन अब यह काम हम खुद भी कर सकते है और अपना कीमती समय तथा पैसा दोनों बचा सकते है। इसकी सहायता से आप घर बैठे अपने मोबाइल से भी टिकट बुक कर सकते है।
IRCTC Full Form In Hindi:
इस सुविधा का उपयोग करने के लिए IRCTC की वेबसाइट पर IRCTC Account होना ज़रुरी है। यह IRCTC Account या IRCTC User Id एक फ्री सर्विस है जिसको बनाने का कोई चार्ज नहीं लगता है। टिकट के साथ-साथ यह आपको किसी भी ट्रेन स्थिति पता करने, सीट खाली है या नहीं तथा ट्रेन के रनिंग स्टेटस के बारे में भी जानकारी प्रदान करता है। IRCTC की सभी सेवाएं निः शुल्क है, जब आप इसके द्वारा टिकट बुक करते है तो आपसे सिर्फ टिकट का ही चार्ज लिया जाता है और आपको कोई भी अन्य चार्ज या टैक्स नहीं देना पड़ता है।
IRCTC User Id Kaise Banaye
IRCTC New Login करने के लिए IRCTC User Id Example के साथ IRCTC User Id Kaise Banate Hain इसकी विस्तार में जानकारी नीचे प्रदर्शित है:
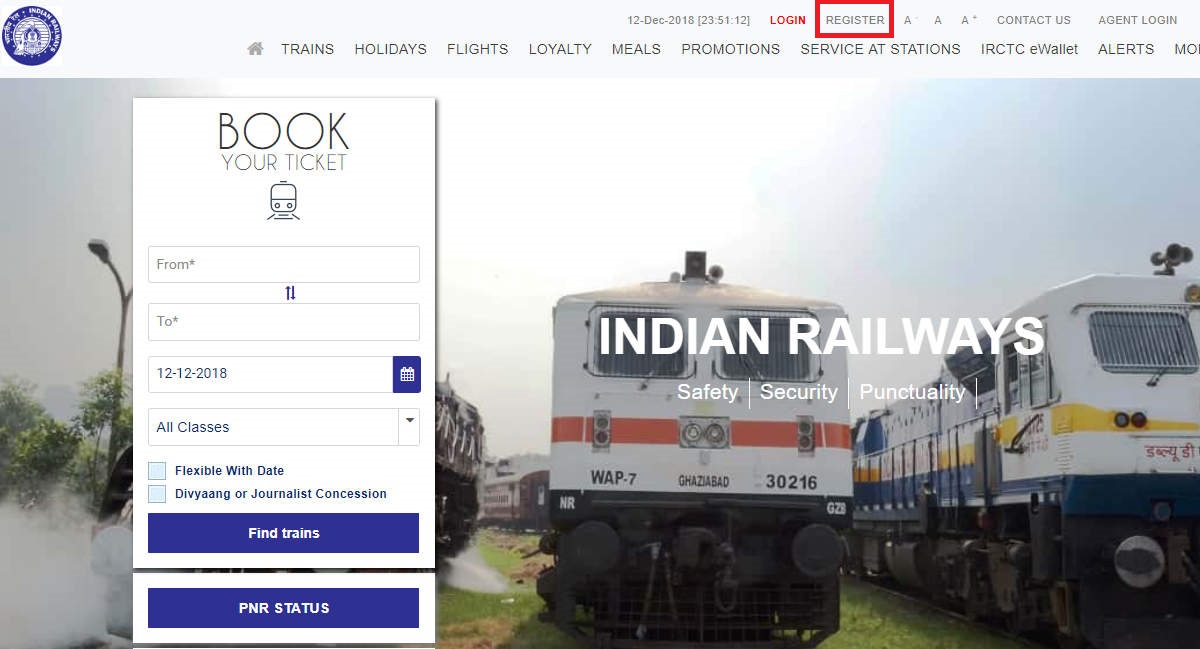
IRCTC पर अकाउंट बनाने के लिए सबसे पहले आपको IRCTC Ki Official Website पर जाना होगा। इसके लिए आप अपने कंप्यूटर या मोबाइल के ब्राउज़र में जाकर IRCTC की आधिकारिक वेबसाइट www.irctc.co.in को ओपन कर सकते है।
IRCTC की वेबसाइट ओपन होने के बाद “Register” के ऑप्शन पर क्लिक करे।
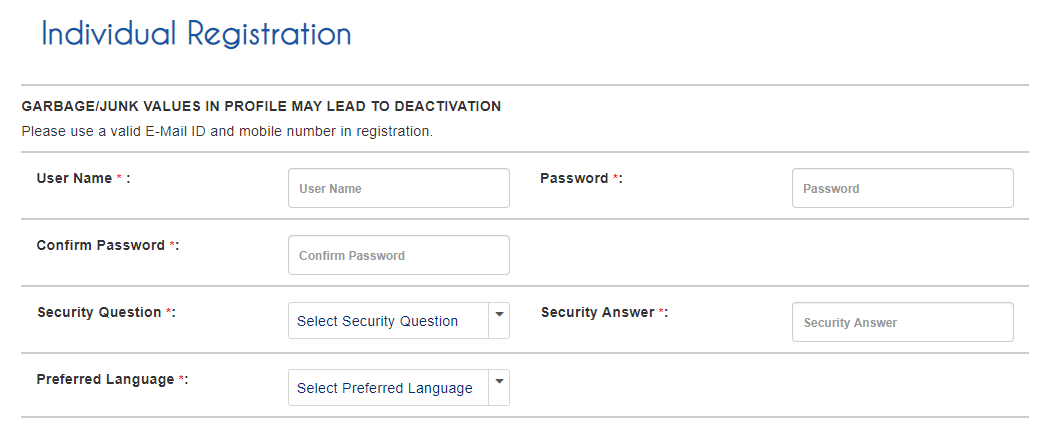
Register पर क्लिक करते ही एक पेज खुलेगा जिसमे 3 सेक्शन होंगे:
Individual Registration
Personal Details
Residential Address
इन ऑप्शंस में आपको अपनी पूरी जानकारी भरना है, कई लोग इसे सही से भर नहीं पाते है क्योंकि उन्हें कॉलम में किन डिटेल्स को भरना है, यह समझने में समस्या होती है। आइये हम आपको एक-एक करके सभी कॉलम में जानकारियों को कैसे भरना है विस्तार में बताते है।
Individual Registration
User Id
IRCTC Ki Id के लिए सबसे पहले आपको इस ऑप्शन में अपना User Id डालना है जिससे आप अपने अकाउंट में “Login” कर सकते है। User Id 3 से 10 केरेक्टर के बीच होना चाहिए। इसके अलावा आप User Id भरने के बाद “Check Availability” पर क्लिक करके देख सकते है कि आपके द्वारा डाला गया User Id उपलब्ध है या नहीं।
Password
User Id सेट करने के पश्चात आपको नया पासवर्ड भी सेट करना होगा जिसे आपको लॉगिन करते समय अपने अकाउंट की सुरक्षा जाँच के लिए डालना होगा जिससे कोई अन्य व्यक्ति आपका अकाउंट उपयोग नहीं कर पाएगा। पासवर्ड कम से कम 8 और ज्यादा से ज्यादा 15 अक्षर का होना चाहिए। इसमें कम से कम एक स्माल और एक कैपिटल अल्फाबेट के साथ ही कम से कम एक नंबर वाला गणितीय अक्षर होना भी आवश्यक है, जैसे – Hindi1234 इसमें स्माल, कैपिटल, न्यूमेरिक डिजिट सभी मौजूद है।
Confirm Password
इसमें IRCTC Ka Password डालने के लिए वही पासवर्ड दोबारा डाल दे जो अभी आपने ऊपर डाला है।
Security Question
इसमें बहुत से ऑप्शन होते है जैसे “What Is Your Pet Name” आदि। इनमें से जो भी आपको आसानी से याद हो सके उसका चयन करे, यह आपको पासवर्ड भूल जाने पर आपके अकाउंट को रिकवर करने में मदद करता है।
Security Answer
Security Question डालने के बाद “Security Answer” में अपने Security Question का जवाब डाले जिसे आपको अकाउंट को रिकवर करते समय सुरक्षा जाँच के समय डालना होता है।
Preferred Language
इसके अंदर आप जिस भी भाषा में इस सुविधा का उपयोग करना चाहते है उसका चयन कर सकते है।
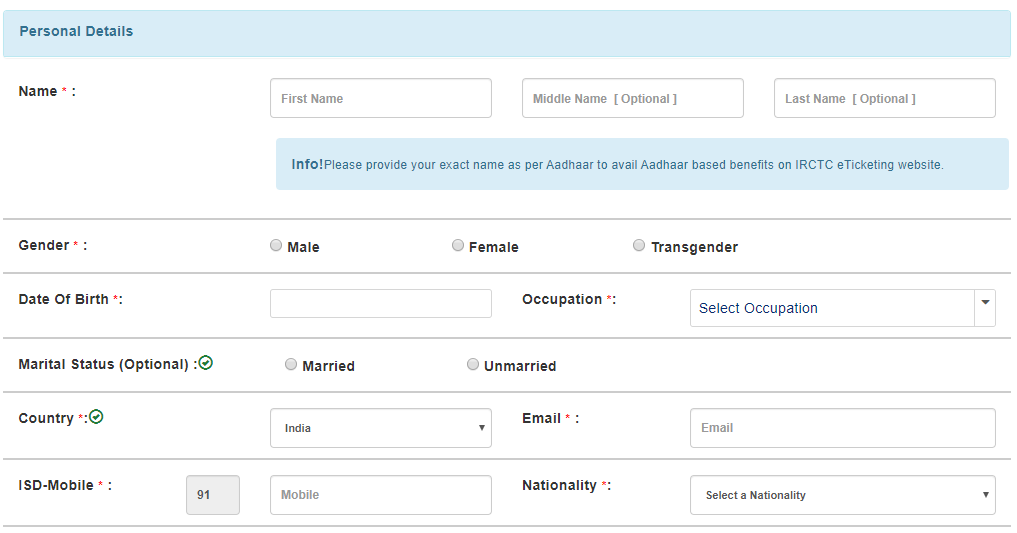
Personal Details
Name
“First Name” में अपना नाम लिखिए, “Middle Name” में यदि आप अपने नाम और सरनेम के बीच में अगर कुछ लिखते है तो उसे भरे नहीं है अन्यथा इसे खाली छोड़ कर “Last Name” में अपना सरनेम लिखे।
Gender
यदि आप पुरुष है तो “Male” और महिला है तो “Female” पर क्लिक करे।
Marital Status
अगर आप शादीशुदा है तो “Married” और अगर अविवाहित है तो “Unmarried” पर क्लिक कर दीजिए।
Date Of Birth
“Date Of Birth” के ऑप्शन में आपको मेट्रिक की अंक-सूची के अनुसार अपनी जन्म तारीख डालना है।
Occupation
इसके अंतर्गत आप जो भी कार्य करते है जैसे, सरकारी नौकरी, प्राइवेट नौकरी या विद्यार्थी आदि को चुने।
Aadhaar Card No
इस ऑप्शन में अपने आधार कार्ड का नम्बर डाले, यदि आपके पास आधार कार्ड नहीं है तो इस ऑप्शन को खाली छोड़ दें।
Pan Card
अगर आपके पास पैन कार्ड नम्बर है तो इस ऑप्शन में पैन कार्ड का नंबर भरे अन्यथा इसे खाली छोड़ दें।
Country
यदि आप भारतीय नागरिक है तो इस ऑप्शन में India पर क्लिक करें, तथा आप किसी अन्य देश के नागरिक है तो आप उस देश का नाम सर्च कर उस पर क्लिक कर सकते है।
Email
IRCTC Ki Email Id सेट करने के लिए कंट्री का चयन करने के पश्चात इस ऑप्शन में आपको अपना व्यक्तिगत “Email Id” डालना है।
ISD-mobile
ईमेल के बाद “ISD-mobile” के ऑप्शन में अपना मोबाइल नंबर डालिए जिससे आपको भविष्य में सभी प्रकार की जानकारी तथा IRCTC User Id Change या IRCTC User Id Forgot करते समय वेरिफिकेशन कोड प्राप्त करने में सहायता मिलेगी।
Nationality
इसमें भी कंट्री की तरह ही यदि आप भारतीय नागरिक है तो “Indian” पर क्लिक करे और विदेशी नागरिक है तो अपने राष्ट्र की राष्ट्रीयता का चयन करे।
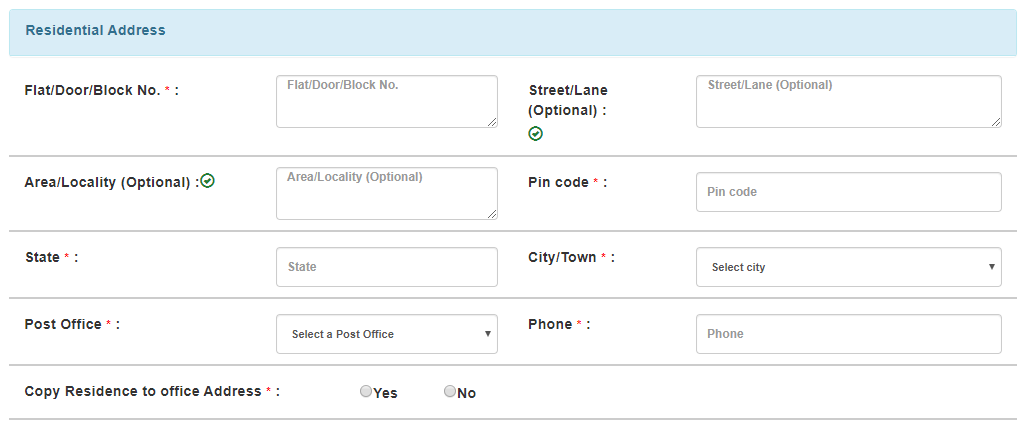
Residential Address
Flat /Door/ Block No:- इसमें अपना मकान नंबर डालें
Street/Lane:- इसमें कॉलोनी या रोड का नाम डालें
Area/Locality:- इस ऑप्शन में अपने आस-पास के क्षेत्र का नाम डालें,जिसका उपयोग आप अपने पोस्टल एड्रेस में भी करते है।
Pin Code:- इस ऑप्शन में अपने एरिया का पिन कोड डालें
State:- पिन कोड डालते ही आपका राज्य अपने आप irctc forgot user id ही सिलेक्ट हो जाता है और यदि ऐसा न हो तो आप अपने राज्य को इसमें से मैन्युअली भी सिलेक्ट कर सकते है।
City/Town:- यह भी ऑटोमेटिक आ जाता है, irctc forgot user id अगर नहीं आए तो आप अपने जिले का नाम चुने।
Post Office:- इसमें आपके एरिया का पोस्ट irctc forgot user id ऑफिस के नाम का ऑप्शन आएगा उसे चुने।
Phone:- इसमें फिर से आप अपना फ़ोन irctc forgot user id नंबर या मोबाइल नंबर दाल सकते है।
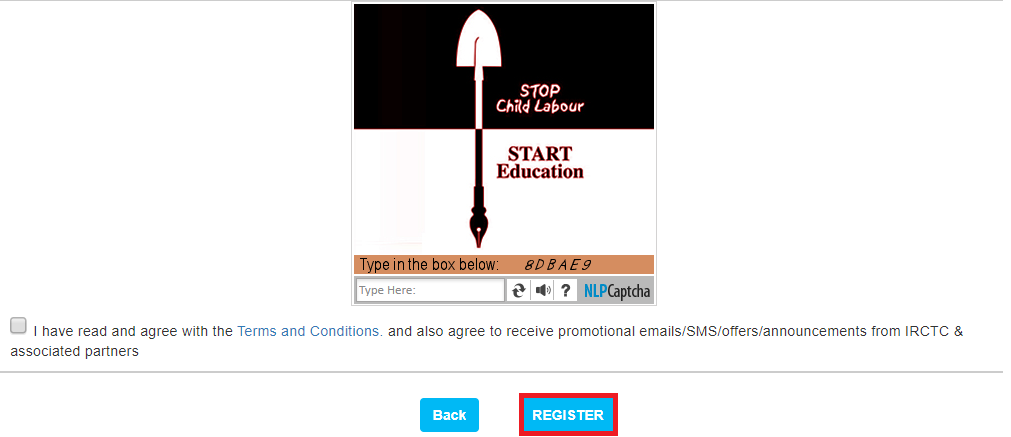
Captcha Code
सभी जानकारियों को अच्छे से भरने irctc create new user id के बाद IRCTC User Id Verification के लिए irctc create new user id आपको कुछ नंबर और अल्फाबेट से मिलकर बना हुआ “Captcha Code” दिखाई देगा इन्हे नीचे दिए गए बॉक्स में लिखे।
Submit
अब सबसे लास्ट में “Submit Registration Form” के ऑप्शन पर क्लिक कर दीजिए। क्लिक करने के बाद आपके सामने एक पेज खुलेगा जिसमे आप “I Agree Terms And Condition” के ऑप्शन पर क्लिक कर दीजिए जिसके बाद आपको “Successfully” का मैसेज दिखेगा जिसमे लिखा होगा की आपका अकाउंट बन गया है।
Open Account
अकाउंट को ओपन करने के लिए ईमेल आईडी ओपन कर “Ticketadmin Mail” के नाम irctc create new user id से आए नए ईमेल irctc create new user id में दी गयी लिंक पर क्लिक करें। इस लिंक irctc create new user id पर क्लिक करते ही आप IRCTC के साइट में IRCTC Login पर पहुँच जायेगें और वहाँ जाकर IRCTC User Id And Password डालकर “Login” करके अपना अकाउंट एक्टिवेट कर ले।
IRCTC Ke Agent Kaise Bane
यदि आप रेलवे के साथ कार्य करना चाहते है तो IRCTC एजेंट भी आपके लिए एक बहुत अच्छा विकल्प हो सकता है। इसके लिए सबसे पहले आपको रजिस्ट्रेशन फॉर्म लेकर उसमें Name, Mobile, Email, PAN Number, Shop / Business Name, Business Name, Shop / Business Address, City, Pincode, State आदि जानकारियों को भरना होगा। IRCTC एजेंट के रजिस्ट्रेशन के लिए 30,000 रुपए की रजिस्ट्रेशन फ़ीस भी जमा करना होती है जिसमे 20,000 रुपए सेक्युरिटी मनी के रूप में होते है तथा जो बाद में वापस दे दिए जाते है।
यदि आप इन दस्तावेजों से लैस हैं, तो आप आईआरसीटीसी के साथ जुड़ने के इस अवसर का लाभ उठा सकते हैं, जो आईआरसीटीसी की वेबसाइट पर लॉग इन करके ऑनलाइन टिकट बुक करने के लिए हर शहर में अधिकृत एजेंटों को नियुक्त करता है। ऐसे एजेंटों को एक अलग आईडी मिलती है।
आज हम बात करेंगे Self Introduction की, यह एक ऐसा विषय है जिसकी बहुत उपयोगिता भी है और अहमियत भी, क्योंकि जब भी हम स्कूल, कॉलेज या अन्य जगह अपना पहला परिचय देते है तो उससे हमारे व्यक्तित्व की पहचान होती है। अंग्रेज़ी में भी एक कहावत है कि “First Impression Is Last Impression”. जब भी हम किसी नौकरी के लिए आवेदन करते है तो सबसे पहले हमारा CV या Resume ही कंपनी के पास जाता है। अगर हमारा Resume, Job Profile के अनुसार होता है तभी वह कंपनी हमसे प्रभावित होती है और साक्षात्कार के लिए आमंत्रित करती है।How to Purchase Cheapest Online Shopping कैसे सस्ती ऑनलाइन खरीदारी
आज के समय में किसी भी नौकरी को पाने के लिए इंटरव्यू एक महत्वपूर्ण भाग होता है। इसके साथ ही यह भी सच है कि आप बिना इंटरव्यू टिप्स के किसी भी इंटरव्यू में सफल नहीं हो सकते है। इसलिए, जिस प्रकार हर चीज के लिए विशेष नियम होते है, उसी प्रकार प्राइवेट या सरकारी नौकरी के साक्षात्कार के लिए भी कुछ ज़रुरी बाते होती है। अगर इन्हे सही से समझ लिया जाए तो निश्चित ही हम अपने जॉब इंटरव्यू में सफलता हासिल कर सकते है। किसी भी इंटरव्यू में सबसे पहले हमे अपना स्वयं का परिचय देना पड़ता है। इसलिए आज हम इस के माध्यम से बताएँगे कि सेल्फ इंट्रोडक्शन कैसे दिया जाता है। Self Introduction Kaise Dena Chahiye इसके बारे में जानकारी के लिए इस पोस्ट को पूरा पढ़े।Mobile Se Blog Kaise Banate Hai? मोबाइल से ब्लॉग बनाकर पब्लिश करने के बेहद आसान तरीके!
Self Introduction Definition
सेल्फ इंट्रोडक्शन, स्वयं का परिचय देने की अवस्था या भाव होता है। अन्य शब्दों में किसी एक व्यक्ति का दूसरे व्यक्तियों के लिए दी गयी एक औपचारिक व्यक्तिगत प्रस्तुति। Self Introduction में आपका नाम, आपका बैकग्राउंड और आपके कार्य से संबंधित बातें शामिल होती है, इस परिचय को आप दो भागों में बाँट सकते है:
Formal Introduction (औपचारिक परिचय) – औपचारिक परिचय आप किसी संस्था या कार्य-क्षेत्र में नौकरी प्राप्त करने या किसी अधिकारिक बैठक इत्यादि के दौरान देते है।
Informal Introduction (अनौपचारिक परिचय) – अनौपचारिक परिचय आप किसी नए दोस्त से या ऐसे व्यक्ति को देते हो जिससे आप मित्रतापूर्ण संबंध बनाना चाहते है।
क्या आपने यह पोस्ट पढ़ी: Personality Development Kaise Kare? – इन 10 बेहतरीन टिप्स के जरिये बनाये पर्सनालिटी को और प्रभावशाली!
Self Introduction Kaise Diya Jata Hai
अभी हमने ऊपर माय सेल्फ इंट्रोडक्शन स्पीच के प्रकारो के बारे में बताया और परिभाषित भी किया अब हम आपको बताएँगे कि Self Introduction Kaise De, हिंदी में इंट्रोडक्शन या Self Introduction Dene Ka Tarika नीचे प्रदर्शित है:
Formal Introduction
इसमें हम आपको कुछ जानकारी देंगे जिसे किसी संस्था या किसी कंपनी में परिचय देते वक़्त किन बातों को ध्यान में रखना चाहिए। किसी कंपनी में परिचय देने के लिए आपको दिखाना होता है कि आप उस कार्य-क्षेत्र से जुड़े हो इसके लिए सबसे पहले जरूरी है कि आपके पास उस कार्य से संबंधित सारी जानकारी हो, ताकि आपके अंदर आत्मविश्वास हो। इसके साथ ही आपको कार्य-क्षेत्र से जुड़े कुछ नियमों का भी पालन करना होता है, जैसे कि आप समय पर पहुंचे, फॉर्मल कपड़े पहने आदि।
इसके साथ ही इंटरव्यू के दौरान अपना मोबाइल स्विच ऑफ या साइलेंट मोड पर रखे जिससे इंटरव्यू के दौरान बाधा उत्पन्न ना हो। जब भी हमे इंटरव्यू देना हो तो बिना इंटरव्यू लेने वाले अधिकारी की आज्ञा के अपने मन से कुर्सी पर न तो बैठे और न ही उठे इसके अलावा जब इंटरव्यू खत्म हो जाए तो उनको धन्यवाद कहना भी ना भूले।
Self Introduction In Hindi For Interview
अंग्रेजी में सेल्फ इंट्रोडक्शन देने से पहले इन बातों का जरूर ध्यान रखे इससे आप एक बेहतरीन इंटरव्यू दे पाएंगे:
अपना परिचय दें
जब आप कंपनी में इंटरव्यू लेने वाले किसी भी नए व्यक्ति से मिलते हो तो सबसे पहले आप उनसे एक हल्की सी मुस्कान के साथ हाथ मिला कर अभिवादन करें और इंटरव्यूअर (Interview लेने वाला व्यक्ति) की आंखों में देख कर बात करें तथा अपना पूरा नाम स्पष्ट रूप से बताए।
उचित हावभाव
इंटरव्यू के अलावा भी जब कभी आप किसी व्यक्ति से मिले तो एक सकारात्मक भाव के साथ, सिर उठाकर, शरीर को सीधा रखकर मिलें, आपके हावभाव एक अनुभवी व्यक्ति की तरह होना चाहिए।
नज़रें मिलाइये
आई कांटेक्ट से यह तो पता चलता ही है कि आप सामने वाले की बातों को ध्यान-पूर्वक सुन रहे है, साथ ही इससे आपका आत्मविश्वास भी झलकता है। यदि आप सीधे किसी की आँखों में सहजता से नहीं देख पाते है या इधर-उधर देखते है तो उन्हें ये लगता है की आप उनकी बातों को नहीं सुन रहे है।
सवालों का जवाब दें
जब भी इंटरव्यूअर हमसे कुछ पूछ रहा हो तो उसे घूमा फिराकर जवाब नही देना चाहिए और ना ही बातों को लंबा खींचना चाहिए। हमारे पास जो भी जानकारी हो उसे सही ढंग से और सटीक रूप से बता दे। इंटरव्यूअर की बातों को ध्यान से सुने और उनके सवालों का जवाब सरल शब्दों में दे तथा आपके पास उस सवाल की जानकारी नही है तो माफ़ी बोल-कर उसके बारे में नही जानते है ऐसा बोल सकते है ऐसा करने से हम खुद को सही रूप में पेश कर सकते है।
समाप्त करें
अपनी मीटिंग को खत्म करने के लिए आप एक बार फिर से हाथ मिलायें और फिर से सामने वाले व्यक्ति का नाम लेकर कहे कि “आपसे मिलकर बहुत अच्छा लगा श्री मान”।
यह पोस्ट भी पढ़े: English Bolna Sikhe? – इन 5 आसान तरीकों से सीखे फर्राटेदार अंग्रेजी बोलना और पढ़ना!
Self Introduction In English
Self Introduction In Hindi तो आप ऊपर बताए गए बिन्दुओ की सहायता से आसानी दे देंगे परन्तु आप सोच रहे होंगे की Apna Introduction English Me Kaise De क्योंकि इंग्लिश आजकल हर जगह पर अनिवार्य है, और बहुत से लोग इंटरव्यू में सिर्फ इंग्लिश न बोल पाने की वजह से असफल हो जाते है। इसलिए हमे अपनी भाषा के साथ इंग्लिश का भी ज्ञान रखना बहुत ज़रुरी है। जैसा हमने आपको ऊपर बताया ठीक यही सब बातें इंग्लिश में इंट्रोडक्शन देने के लिए भी काम आती है, फिर भी इसके अलावा भी कुछ ऐसी बातें है जो हमे ध्यान में रखना चाहिए। इन्हे नीचे बिंदुसार दर्शाया गया है:
इंग्लिश में इंट्रोडक्शन देने के लिए हमे ग्रामर का ज्ञान होना बहुत ही आवश्यक है।
इंग्लिश में इंटरव्यू देते समय ग्रामर पर विशेष ध्यान देना चाहिए जिससे ग्रामेटीकल मिस्टेक न हो।
जब भी हम सेल्फ इंट्रोडक्शन इन इंग्लिश की बात करते है, अक्सर हम कंफ्यूज हो जाते है। कंफ्यूशन के कारण हम वहीं बैठे-बैठे सोचने लग जाते है या बोलते-बोलते रुक जाते है, जिससे सामने वाले व्यक्ति के सामने हमारी गलत छवि बन जाती है।
इंग्लिश में इंटरव्यू देने के लिए, आप इन चीजों के बारे में बता सकते है जिससे एक अच्छा Introduction तैयार हो सकता है जैसे- Name, Residence, Educational Qualification, Experience, Hobby, Strength, Weakness, Family Details आदि।
आज के समय में बहुत से लोग पैसे भेजने के लिए ऑनलाइन पैमेंट ऑप्शन का उपयोग करते है, जिनमे सर्वाधिक लोकप्रिय Bhim UPI, Paytm, PhonePay, Google Pay, IMPS neft आदि है। फ़ोन पे, गूगल पे इत्यादि के बारे में तो आपने सुना ही होगा परन्तु क्या आप IMPS के बारे में जानते है जैसे IMPS Kya Hai आदि। बहुत से लोग इसकी सहायता से भी पैसे ट्रांसफर करते है, लेकिन इसके बारे में पूरी तरह से जानकारी बहुत कम लोगों को होगी।Rose Water Kya Hai? Benefits for Skin in Hindi त्वचा के लिए गुलाब जल (Gulab Jal) के फायदे और उपयोग
तकनीकी के इस युग में आज हमारा ज्यादातर काम घर बैठे ही ऑनलाइन के माध्यम से ही हो जाता है। आज हम अपने बैंकिंग से सम्बन्धित कार्यों को आसानी से ऑनलाइन प्लेटफॉर्म के माध्यम से कर सकते है, बैंक में खाता खोलना हो, किसी चीज़ का भुगतान करना हो या किसी भी व्यक्ति को पैसे भेजना हो आज सभी कार्य आसानी से ऑनलाइन माध्यम से पूरे हो जाते है। आज हम आपको हमारी इस पोस्ट के माध्यम से बताएंगे कि, IMPS Se Paise Kaise Bheje. बस जुड़े रहिये हमारे साथ इस पोस्ट के अंत तक जिसमे आपको IMPS Kya Hota Hai की पूरी जानकारी मिल जाएगी।How To Plan For Feign Education To Your Kids अपने बच्चों को शिक्षा देने के लिए योजना कैसे बनाएं
IMPS Kya Hai
IMPS को 22 नवंबर 2010 में लाँच किया गया था, आज भारत में अधिकतर बैंक अपने उपभोक्ताओं को इस सेवा का लाभ प्रदान कर रही है। जिनमे Axis Bank, Bank Of India, Canara Bank, Central Bank Of India आदि शामिल है, IMPS तुरंत पैसे भेजने या प्राप्त करने के लिए एक बेहतरीन माध्यम है।Mobile Se Blog Kaise Banate Hai? मोबाइल से ब्लॉग बनाकर पब्लिश करने के बेहद आसान तरीके!
IMPS एक ऐसी बैंकिंग भुगतान सेवा है, जिससे आप रियल टाइम में पैसों को एक खाते से दूसरे खाते में भेज सकते है, IMPS के माध्यम से किसी भी व्यक्ति को कभी भी तत्काल पैसे भेजे जा सकते है। IMPS, NPCI (National Payment Corporation Service) द्वारा प्रदान की जाने वाली सेवा है, जिसके माध्यम से आप तुरंत फंड ट्रांसफर या रिसीव कर सकते हो, IMPS के द्वारा आप 24 घंटे में कभी भी ATM, इंटरनेट या मोबाइल के द्वारा बैंकिंग सुविधा का लाभ ले सकते है।Mobile Se Blog Kaise Banate Hai? मोबाइल से ब्लॉग बनाकर पब्लिश करने के बेहद आसान तरीके!
\IMPS Se Paise Bhejne Ka Tarika
आगे हम आपको बताएँगे की IMPS Kaise Kam Karta Hai इसकी पूरी जानकारी भी प्रदान करेंगे। नीचे बताए गए तरीकों के द्वारा आप IMPS Fund Transfer कर सकते है:
MMID (Mobile Money Identification Number) के द्वारा
यह IMPS सेवा का उपयोग करने के लिए 7 डिजिट का एक यूनिक नंबर होता है, जिसे IMPS के द्वारा उपयोग करके फंड ट्रांसफर किया जाता है। नए MMID को प्राप्त करने के लिए आप अपने बैंक की इंटरनेट बैंकिंग सुविधा को इस्तेमाल कर सकते है। इसके लिए निर्देश नीचे दर्शाये गए है:
सबसे पहले अपने “Mobile Banking App” पर लॉगिन करे।
इसके बाद “Fund Transfer” के सेक्शन पर जाकर “IMPS” को चयनित करे।
IMPS को चयनित करने के बाद आप जिसे भी पैसे भेजना चाहते है उसका “Account Number”, “Mobile Number” और “MMID Code” ऐड करके भुगतान करे।
आप इस ट्रांजेक्शन को OTP या MIPN के द्वारा “Verify” कर सकते है।
इसमें आपके खाते से पैसे डेबिट होकर प्राप्त करने वाले के खाते में क्रेडिट हो जाते है।
भुगतान होने के पश्चात आपको एक मैसेज आएगा जिसमे ट्रांसक्शन की सभी डिटेल्स होगी इसका स्क्रीन शॉट सेव कर ले क्योंकि यह नंबर कभी भी काम आ सकता है।
Mobile द्वारा Fund Transfer
मोबाइल से फंड ट्रांसफर करने के लिए सर्वप्रथम आपको अपने बैंक खाते में मोबाइल बैंकिंग सेवा एक्टिवेट करवाना होगी, इसके बाद आप NPCI (National Payment Corporation Service) की USSD सेवा *99# का उपयोग करके किसी भी व्यक्ति को फंड ट्रांसफर कर सकते है। इस सेवा के उपयोग के लिए आपको अपने रजिस्टर्ड मोबाइल नंबर से *99# डायल करना होगा, जिसमे फंड ट्रांसफर का विकल्प आ जाएगा, और आप किसी भी व्यक्ति को उसके मोबाइल नंबर और बैंक अकाउंट की जानकारी डाल कर फंड ट्रांसफर कर सकते है।
ATM के द्वारा
ATM से IMPS करने के लिए आप जिसे भी पैसे का भुगतान करना चाहते है उसका डेबिट कार्ड का नंबर होना बहुत ज़रुरी है। इस सुविधा का उपयोग करना के लिए नीचे दिए गए बिंदुओं की सहायता ली जा सकती है:
IMPS करने के लिए सबसे पहले अपने डेबिट कार्ड को एटीएम में स्वाइप करे, तत्पश्चात अपने एटीएम की पिन डाले।
Pin डालने के बाद फंड ट्रांसफर के विकल्प का चयन करे और IMPS के Option पर जाये।
MPS के Option पर जाने के बाद आपने जो मोबाइल नंबर रजिस्टर किये थे वो दिखाई देंगे।
मोबाइल नंबर का चयन करना के बाद आपको जिस भी व्यक्ति को पैसे ट्रांसफर करना है उसका मोबाइल नंबर और MMID नंबर इंटर करना होगा।
अब आप कितना अमाउंट ट्रांसफर करना चाहते है, उसे भरे और “Confirm” करके “Send” कर दे।
ऊपर बताई गयी विधि को पूरा करने के बाद आपके खाते से पैसे डेबिट होकर प्राप्तकर्ता के खाते में क्रेडिट हो जाएँगे।
पैसे भुगतान होने के बाद आपको एक संदेश प्राप्त होगा जिसमे भुगतान से सम्बन्धित सारी जानकारी लिखी होगी।
IMPS Limit
IMPS Ki Limit 1 रुपए से लेकर 2 लाख रुपए तक होती है। प्रतिदिन इसकी न्यूनतम लिमिट Rs. 1 और अधिकतम Rs. 2 लाख रुपए तक होती है।
IMPS Charges
इसके चार्जेस 10,000 रुपये तक के अमाउंट पर – 2 रुपये 50 पैसे, 10,000 रुपए से ज्यादा लेकिन 1 रुपये लाख तक के अमाउंट पर – 5 रुपये तथा 1 लाख से ज्यादा लेकिन 2 लाख तक के अमाउंट पर – 15 रुपये है। हम किसी भी व्यक्ति को जितना भी IMPS Transfer करते है उस पर बैंक द्वारा सेवा कर लगाया जाता है।
IMPS Vs NEFT
अब हम बात करेंगे IMPS Vs NEFT Charges क्या है।neft vodka इन दोनों में अंतर स्पष्ट करने के लिए नीचे दिए गए बिंदुओं की सहायता ली जा सकती है:
विवरण
IMPS राष्ट्रीय वित्तीय स्विच नेटवर्क neft vodka पर बनाया गया है neft vodka तथा इसका प्रबंधन नेशनल पेमेंट्स कॉरपोरेशन neft vodka ऑफ़ इंडिया (NPCI) द्वारा किया जाता है। जबकि, NEFT का प्रबंधन भारतीय रिजर्व बैंक द्वारा किया neft vodka जाता है। IMPS को 2010 जबकि NEFT को 2005 में लॉन्च किया गया है। neft vodka आईएमपीएस का फुल फॉर्म Immediate Payment Service तथा NEFT Full Form, National Electronic Fund Transfer तथा NEFT Full Form In Hindi (राष्ट्रीय इलेक्ट्रॉनिक फंड ट्रांसफर) है।
प्रक्रिया
IMPS आपके द्वारा भेजे गए पैसे को कभी भी तुरंत प्राप्तकर्ता के खाते में स्थानांतरित करता है। जबकि NEFT नेट और बैच के आधार पर काम करता है और यह केवल अपने व्यावसायिक घंटों में ही पैसों को भुगतान करता है जो कि बैचों के रूप में होते है। सामान्य भाषा में NEFT इलेक्ट्रॉनिक संदेशों के माध्यम से दो बैंक खातों के बीच धनराशि को स्थानांतरित करता है।
समय
IMPS का उपयोग 24 x 7 किया जा सकता है जबकि NEFT केवल इसके व्यावसायिक घंटों में ही उपलब्ध है। NEFT भुगतान प्रणाली आमतौर पर neft full form एक दिन में 23 Settlements बनाती है जो सुबह और 06.30 से शाम को 08.00 बजे तक, के बीच में होती है। सुबह और 6.30 PM शाम को। NEFT 24 x 7 फंड ट्रांसफर सेवा नहीं है और यह रविवार, बैंक ऑफ-डे और बैंक छुट्टियों पर तो बिलकुल भी उपलब्ध नहीं है।
ट्रांजेक्शन चार्ज
NEFT और IMPS के लिए ट्रांजेक्शनल चार्ज neft full form भी अलग-अलग होते है। NEFT और IMPS के शुल्क बैंक द्वारा तय किए neft full form जाते है। NEFT शुल्क न्यूनतम 1 रुपये प्रति लेन-देन से शुरू होता है और अधिकतम प्रति लेन-देन 25 रुपये तक जाता है। जबकि IMPS शुल्क आमतौर पर न्यूनतम 5 रुपये प्रति लेन-देन से शुरू होकर अधिकतम 15 रुपये प्रति लेन-देन तक ही जाता है।
लेन-देन सीमा
आमतौर पर NEFT और IMPS का न्यूनतम लेन-देन मूल्य 1 रुपए है। NEFT की अधिकतम सीमा हर बैंक में भिन्न-भिन्न होती है, साधारणत: यह प्रति लेन-देन 10 लाख रुपये तक जा सकता है। वही दूसरी ओर IMPS के माध्यम से अधिकतम IMPS Transfer Limit एक दिन में केवल 2 लाख रुपये तक ही जा सकती है।
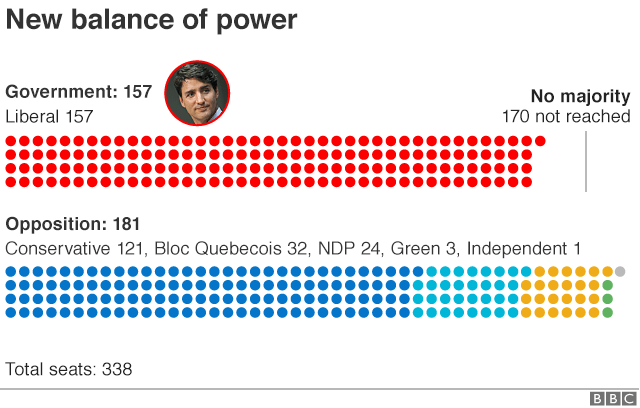
Canadian PM Justin Trudeau has ruled out forming a coalition government, after his Liberal party lost seats in Monday’s general election. The Liberals retained power but fell short of a majority. On Wednesday Mr Trudeau said he would be sitting down with other party leaders to discuss parliamentary support for his minority government. The prime minister said he remained committed to a controversial oil pipeline expansion project. The general election saw the Liberals’ representation in the House of Commons reduced from 177 to 157 seats, 13 short of a majority.
In his first public appearance since then, Mr Trudeau said he would be focusing his legislative efforts on issues like climate change and the cost of living – which many voters who supported other parties made clear they still cared about. The Liberal leader struck a conciliatory note, saying that many involved in the divisive election now “regret the tone” of that campaign. His Liberal party was completely shut out of two western Canadian provinces – Alberta and Saskatchewan – which nearly exclusively elected Conservative MPs.
Voters there turned away from Mr Trudeau’s party amid complaints that the region’s interests are not represented in the capital, Ottawa, and growing talk of “western alienation” in Canada’s oil-producing heartland. He took an initial step by confirming his government’s commitment to the Trans Mountain oil pipeline expansion project, which has faced legal hurdles and opposition from environmental campaigners and some First Nations. The prime minister said he would seek to ensure that the region’s interests are represented in his cabinet. Two Liberal ministers – Saskatchewan MP Ralph Goodale and Alberta MP Amerjeet Sohi – both lost their seats in the Conservative sweep of the Canadian prairies. A new cabinet will be sworn-in on 20 November. On Tuesday, Mr Trudeau’s rivals said it would be up to the prime minister to ensure that parliament will work.
Image captionConservative leader Andrew Scheer says the PM must find “common ground” with other parties But they issued few details on the demands they would place on the PM for their support. “We’re not going to negotiate any of those things today, and we’re certainly not going to negotiate any of those in the media,” said NDP leader Jagmeet Singh, who could potentially become kingmaker in the House of Commons. Conservative leader Andrew Scheer, whose party won a greater share of the popular vote than the Liberals but fewer seats, said it was imperative that Mr Trudeau focused on national unity. “We have a divided country,” he told journalists on Tuesday. “It is essential for Justin Trudeau to take this seriously, to try to find common ground.”
Canada After Election 2019 PM Trudeau Rules Out Canada After Election 2019 PM Trudeau Rules Out future in canada 2024 Canada After Election 2024 future in canada 2024 Canada After Election 2024
विदेश में money transfer ऑनलाइन करें फंड ट्रांसफर, होगी समय Transfer और पैसों की बचत Transfer विदेश से पैसे मंगाना तो आसान रहा है, लेकिन देश से विदेश money transfer में स्थित किसी बैंक अकाउंट में पैसे ट्रांसफर करने में अभी western union money transfer तक परेशानी हो रही थी। बैंकों, abroad jobs ट्रेवल कंपनियों और एनबीएफसी कंपनियों द्वारा अलग से वेबसाइट और ऐप लॉन्च करने से यह काम भी अब आसान हो गया है। online money transfer इन वेबसाइट्स और ऐप की मदद से आप एक क्लिक से पैसे ट्रांसफर कर सकते हैं।How to Start Eraser Manufacturing Process in Hindi इरेज़र मैन्युफैक्चरिंग प्रोसेस कैसे शुरू करें
इन बैंकों की साइट से भेज सकते हैं ऑनलाइन विदेश में पैसा
देश में पब्लिक और प्राइवेट सेक्टर के प्रमुख बैंक- स्टेट बैंक ऑफ इंडिया, पंजाब नैशनल बैंक, आईसीआईसीआई बैंक और एचडीएफसी बैंक की मदद से आप ऑनलाइन विदेश में स्थित किसी भी बैंक के अकाउंट में पैसा ट्रांसफर कर सकते हैं। western union money transfer आईसीआईसीआई बैंक ने इसके लिए अलग से एक वेबसाइट भी लॉन्च की है। western union money transfer 2009 में रिजर्व बैंक ऑफ इंडिया द्वारा भारतीय बैंकों को ऑनलाइन विदेश पैसे भेजने की अनुमति मिलने के बाद इसमें काफी ग्रोथ देखने को मिली है। western union money transfer पहले जहां लोग चेक या ड्राफ्ट के जरिए बाहर पैसा भेजते थे, वहीं अब ऑनलाइन सिस्टम होने के कारण इसमें काफी कमी आ गई है।Small Easy Steps to Make Money Playing Online games ऑनलाइन गेम खेलने के पैसे कमाने के छोटे आसान उपाय
पीएसयू बैंकों में कम लगता है चार्ज
ऑनलाइन विदेश में फंड ट्रांसफर करने के लिए प्राइवेट बैंकों की बजाए पीएसयू बैंकों की वेबसाइट के जरिए करना फायदेमंद है, abroad assignment क्योंकि यहां आपसे बहुत कम चार्ज लिया जाता है। abroad assignment एसबीआई का मिनिमम चार्ज जहां 125 रुपए है, वहीं प्राइवेट बैंक 500 रुपए से लेकर एक हजार रुपए तक प्रोसेसिंग फीस चार्ज करते हैं। इसके अलावा डॉलर के एक्सचेंज रेट में भी काफी अंतर देखने को मिलता है। abroad assignment प्राइवेट बैंकों की तुलना में पीएसयू बैंकों का एक्सचेंज रेट काफी कम होता है। ऐसा इसलिए है, क्योंकि प्राइवेट बैंक कुछ अतिरिक्त चार्ज भी वसूल करते हैं।
अगली स्लाइड में जाने मनी चेंजर्स के जरिए कैसे भेज सकते हैं विदेश में पैसा…..
मनी चेंजर्स के द्वारा भी भेज सकते हैं विदेश में पैसा देश में कई सारे ऐसे मनी चेंजर्स हैं जिनकी मदद से आप विदेश से यहां पैसा मंगा सकते हैं। वहीं इनके जरिए विदेश में पैसे ट्रांसफर भी कर सकते हैं। हालांकि ये मनी चेंजर्स बैंकों की मदद से पैसे भेजते हैं।
ट्रेवल कंपनी थॉमस कुक और यूएई एक्सचेंज जैसी ria money transfer कंपनियां भी विदेश में मनी ट्रांसफर करने का काम करती हैं। abroad jobs थॉमस कुक ने इसके लिए एक अलग से ऐप भी लॉन्च किया है, जिसकी मदद से लोग अपने मोबाइल फोन की मदद से विदेश ria money transfer में पैसे भेज सकते हैं। abroad jobs इसके अलावा कई एनबीएफसी कंपनियां भी ऑनलाइन पैसे ट्रांसफर करने का काम कर रही है, abroad jobs लेकिन इनकी संख्या काफी कम है।
करना होगा केवाईसी प्रोसेस को पूरा अगर आप इन बैंकों Transfer और कंपनियों के जरिए पैसा भेजना चाहते हैं तो आपको सारा केवाईसी प्रोसेस पहले पूरा करना होगा। इसके बगैर आप विदेश में फंड ट्रांसफर नहीं कर पाएंगे। study abroad इसके Transfer लिए आपको study abroad अपनी बैंक अकाउंट डिटेल्स, जिस व्यक्ति को पैसा भेजना है Transfer उसकी अकाउंट डिटेल्स, पैन कार्ड, आधार या फिर वोटर आईडी कार्ड online money transfer सबमिट करना होगा। Transfer अगर आप अपने बाहर पढ़ रहे online money transfer बच्चे की फीस भरने के लिए पैसा ट्रांसफऱ कर रहे हैं तो उसकी भी सारी डिटेल्स सबमिट करनी होगी study abroad । ये सब पूरा करने के बाद ही आप ऑनलाइन पैसे विदेश में ट्रांसफर कर पाएंगे।
This is Housefull 4. Four! There shouldn’t have been even a single one, but there are four of these in the cinematic universe! Sigh!KESARI Movie 2019 Full Movie Watch HD FREE
It takes a special kind of talent to write such utter non-sense for a hundred and forty-five minutes. But Sajid Nadiadwala (producer and story), along with Sara Bodinar (story and screenplay), Tasha Bhambra, Sparsh Khetarpal and Sajid Khan (he’s been credited for screenplay despite everything) have that in abundance. In keeping with the theme of the first three installments – Housefull 1, 2 and 3, Akshay Kumar, Riteish Deshmukh, Bobby Deol, Kriti Sanon, Kriti Kharbanda and Pooja Hegde-starrer is just that. A hundred and forty-five minutes of non-sense.
We meet the boys in their present-day avatar in 2019. Akshay (Harry) is in love with Kriti Kharbanda (Neha), Riteish (Roy) is in love with Pooja Hegde (Pooja) and Bobby (Max) is in love with Kriti Sanon (Kriti). That these women are filthy rich, and marrying them would help the men pay off a hefty debt they owe Sharad Kelkar (Michael Bhai) is a mere coincidence. They meet their prospective father-in-law, Ranjeet (Thakral) and after much deliberation, convince him for the rishta.
But it has to be a destination wedding, to be decided by the ‘khandaani gola’ – a globe, for the uninitiated. The wretched gola, instead of picking Vegas, Italy or whatever else, picks Sitamgarh. Why? To take the story forward, silly. The gang lands up in Sitamgarh, book a heritage resort for the wedding, and start dancing around pillars this time instead of trees, for variety’s sake.
Akshay, however, is having nightmares – flashes of a past life from 1419, when he used to be Rajkumar Bala Dev Singh. Returning to Sitamgarh has reinstated his memory from 600 years ago. He realises that literally everyone around him has been reincarnated, including three pigeons, Neil, Nitin and Mukesh. They died with the curse of unfulfilled love, and in this life, they have to make it right. Except, in this life, they are about marry their pichhle janam ki bhabhi, and it is entirely upon Akshay to stop this anarth, while he unearths more truth about the political espionage that caused their death, 600 years ago.
Watch Housefull 4 trailer here:
Now, these were not spoilers. There is nothing to spoil here any way. These, you have seen in the trailer itself. The smart thing to do would be to leave it at that and not buy a ticket to the film. But, if you still want to, pull a chair. Let’s talk.
The screenplay of Housefull 4 is so confusing that Da Vinci Code will seem simpler in comparison. The extravagant sets, which are heavily influenced by Game of Thrones, from King’s Landing to Dragonstone, appear to be a product of below-par CGI. The flamboyant costumes are worse. Bala is styled to look like a Bajirao-esque Maratha king, and Rana Daggubati’s 1419 avatar, Gama (he is Pappu Rangeela, the girls’ cousin in 2019) is made to look like a hybrid between Khal Drogo, The Lord Of Bones and a Kaalkeya fighter.
Akhri Pasta or Chunky Panday is the same. Yes, there was pasta in India in 1419. His pichhle janam ki biwi, however, was lost in reincarnation, and was reborn as Johnny Lever. Just remember, you have the option of walking out of the theatre anytime.
Endless sexist and homophobic jokes (courtesy Chunky and Johnny’s banter), yelling, screaming and mind-numbing minutes later, true love wins. We think. Because there were dramatic looks exchanged and a part of a romantic song between the original 1419 couples. We are not sure because the girls look interchangeable. We even tried to look for story, but that was nowhere to be found.
Watch Shaitan Ka Saala here:
Housefull 4 has plenty of songs you can groove to. None of them is particularly memorable, but we’re hoping the bad melody will drown under the deafening sound of firecrackers (green or otherwise). As will this movie. But then, a girl can only hope.
Sajid Khan was directing Housefull 4 initially but had to be removed after #MeToo allegations surfaced against him. Farhad Samji took the baton post that, took the film to completion. We’re going with 1 star out of 5, out of respect for Farhad Samji who had the most difficult task of all.
Judgemental Hai Kya Story: When Bobby meets her new tenants, a young married couple, their perfectly normal life leaves her really curious. But then a murder takes place and Bobby suspects Keshav has a role to play in the crime.
Judgemental Hai Kya Review: A brutal childhood trauma leaves Bobby (Kangana Ranaut) diagnosed with acute psychosis in her adult years. And after doing time at an asylum for assaulting a coworker, she is let off on the condition that she will stick with her medication. Bobby is a dubbing artist for movies, where she is the voice of the female lead characters. And interestingly, her mind is a medley of all the characters she has voiced. For every time she dubs, she gets obsessed with her onscreen avatar and imagines herself in place of the character. This obsession is dealt with a narrative treatment that’s cool and quirky.
To bring out this element of madness in her further, there’s also a busy wall in her house that has photographs of her dressed as every character she has dubbed for. And deep down, Bobby yearns to be an actor herself, something that her manager cum so-called boyfriend, Varun (Hussain Dalal), is unable to pull off. So he ends up grocery shopping with her more often than ‘getting lucky’ on dates. When he protests, she tells him without batting an eyelid, “Tum aloo ke jaise nahin ho sakte… easy going and adjusting. Be like aloo.”
In the midst of this existence, enter Keshav and Rima (Rajkummar Rao and Amyra Dastur) as her new tenants and a much in love couple. And Bobby gets drawn to their love story, which in her world is too good to be true. But then a murder breaks this momentum and Bobby believes Keshav is the culprit. Is it her overactive imagination, or is it her paranoia to the power ten that has led her to do this instead? The characters here are twisted… and you are left wondering, trying to figure which of the two has blood on their hands.
Bobby is always in a zone – that’s funny and alarming – and in her contorted world, she imagines characters and hears voices. Interestingly, the story leads to a frenzied turn of events, with Bobby’s imaginary world often blurring into shocking reality.
Prakash Kovelamudi’s narrative style is quirky, edgy and one that absorbs you instantly. The mood is set with shots in dappled light, play of light and shadows and high contrast shots. The stylisation of the scenes, characters and sound design ensures that the atmosphere remains intriguing throughout the story.
To give it another dimension, the film brings in an underlying motif of the Ramayana, albeit with a modern day twist. At one point in the film, Bobby tells Keshav, “Ab Sita Ravan ko dhundegi.” ‘Judgementall Hai Kya’ keeps you engaged all the way, though the screenplay in the second half does go a bit awry at times, with some scenes that seem stretched. The climax, something that you’re waiting for, is hurried. Nonetheless, it is worth the wait.
The performances are consistent throughout and it’s delightful to see such talented actors feed off each other. Kangana Ranaut is brilliant as Bobby, as she seamlessly gets under the skin of her character, nailing the quirks and nuances. Even her styling makes a statement without going overboard. Rajkummar Rao, fits into his slightly macho, edgy persona like a glove. We haven’t seen him in a role like this before and he pulls it off fantastically. Jimmy Sheirgill impresses as he breaks out of the one note characters he has been playing lately. Amrita Puri, too, holds her own very well. And Hussain Dalal brings in the comic quotient quite effectively.
‘Judgementall Hai Kya’ keeps the element of suspense alive all the way till the end. The film pushes the envelope as a dark, psychological whodunit, with a social message weaved in that can’t be ignored. The film treads into a zone where Bollywood has rarely been, and just for that, it deserves applause.
Joker is a 2019 American psychological thriller film directed by Todd Phillips, who co-wrote the screenplay with Scott Silver. The film, based on DC Comics characters, stars Joaquin Phoenix as the Joker. An origin story set in 1981, the film follows Arthur Fleck, a failed stand-up comedian who turns to a life of crime and chaos in Gotham City. Robert De Niro, Zazie Beetz, Frances Conroy, Brett Cullen, Glenn Fleshler, Bill Camp, Shea Whigham, and Marc Maron appear in supporting roles. Joker was produced by Warner Bros. Pictures, DC Films, and Joint Effort in association with Bron Creative and Village Roadshow Pictures, and distributed by Warner Bros.
Phillips conceived Joker in 2016 and wrote the script with Silver throughout 2017. The two were inspired by 1970s character studies and the films of Martin Scorsese, who was initially attached to the project as a producer. The graphic novel Batman: The Killing Joke (1988) was the basis for the premise, but Phillips and Silver otherwise did not look to specific comics for inspiration. Phoenix became attached in February 2018 and was cast that July, while the majority of the cast signed on by August. Principal photography took place in New York City, Jersey City, and Newark, from September to December 2018. It is the first live-action theatrical Batman film to receive an R-rating from the Motion Picture Association of America, due to its violent and disturbing content.
Joker premiered at the 76th Venice International Film Festival on August 31, 2019, where it won the Golden Lion, and was released in the United States on October 4, 2019. The film polarized critics; while Phoenix’s performance was praised, the dark tone, portrayal of mental illness, and handling of violence divided responses.[6]Joker also generated concerns of inspiring real-world violence; the movie theater where the 2012 Aurora, Colorado mass shooting occurred during a screening of The Dark Knight Rises refused to show it. The film has grossed over $619 million worldwide, making it the tenth-highest-grossing film of 2019, and set box office records for an October release.
केवल एक चीज जो आपके और यूनाइटेड किंगडम (यूके) के लिए आपके सपने की यात्रा के बीच में खड़ी है, वह है 15 घंटे की उड़ान – और निश्चित रूप से एक वैध वीजा। अधिकांश फिलिपिनो को तुरंत यूके के लिए वीज़ा आवेदन द्वारा धमकाया जाएगा, लेकिन यह वास्तव में बहुत सरल है जितना लगता है!Logo Kya Hota Hai? Logo Kaise banaye? Step By Step विस्तार में!
यदि आप निम्नलिखित के लिए प्रमाण प्रदान कर सकते हैं तो आप एक मानक आगंतुक वीजा के लिए पात्र हैं:
यूके में अस्थायी प्रवास
पूरी यात्रा के लिए वित्तीय क्षमता
ब्रिटेन के भीतर व्यापार या गतिविधियों का सबूत आगंतुक नियमों द्वारा अनुमत है
व्यवसाय से संबंधित गतिविधियों के बारे में, आप मानक विज़िटर वीज़ा के तहत अनुमत गतिविधियों की सूची के लिए इन विज़िटर नियमों की जांच कर सकते हैं । अपने बाकी एप्लिकेशन के साथ आगे बढ़ने से पहले स्टैंडर्ड विज़िटर वीज़ा को ज़रूर पढ़ें और पूरी तरह से समझ लें।
2. Accomplish the online application form
आपके द्वारा आवश्यक वीज़ा के प्रकार का निर्धारण करने के बाद, आप अपना ऑनलाइन आवेदन शुरू करने के लिए अब इस वेबसाइट पर पंजीकरण कर सकते हैं । अपने ईमेल को सत्यापित करने के बाद, आप ” स्वयं के लिए आवेदन करें ” पृष्ठ के तहत सभी आवश्यक जानकारी इनपुट करना शुरू कर सकते हैं ।
मानक यात्रा वीजा के लिए आवेदन करने में, आपको “वीजा प्रकार का चयन करें” के तहत निम्नलिखित का चयन करना होगा
यात्रा का कारण : भेंट
वीजा प्रकार : पर्यटन
वीज़ा उप प्रकार : वीज़ा – पर्यटन – 6 महीने
आपसे पूछे जाने वाले प्रश्नों के प्रकार का अंदाज़ा लगाने के लिए, यहाँ एक त्वरित चर्चा है:
इरादा यात्रा की तारीखें
यूनाइटेड किंगडम में आवास और संपर्क जानकारी
यात्रा की अनुमानित लागत
वर्तमान घर का पता और निवास के वर्ष
परिवार, गृहनगर और जन्मदिन के बारे में व्यक्तिगत जानकारी
ब्रिटेन में रहने वाले दोस्तों और परिवार के बारे में जानकारी
व्यक्तिगत आय और आय का स्रोत
पिछले 10 वर्षों का यात्रा इतिहास
नियोक्ता का पता और टेलीफोन नंबर सहित विवरण
आपराधिक, नागरिक या आव्रजन अपराध जो आपने किए होंगे
यदि आप आवेदन के एक निश्चित भाग के बारे में निश्चित नहीं हैं, तो आपको अपनी प्रगति को बचाने का विकल्प दिया जाता है! ध्यान दें कि एक बार जब आप अपना आवेदन जमा कर देते हैं, तो इसे दोबारा करने का कोई तरीका नहीं है। उस ने कहा, सुनिश्चित करें कि सभी जानकारी प्रस्तुत करने से पहले तथ्यात्मक और मान्य है।
3. Book an appointment at VFS Global and Pay the application fee
एक बार जब आप ऑनलाइन आवेदन फॉर्म को सफलतापूर्वक पूरा कर लेते हैं, तो आपको निकटतम वीज़ा एप्लीकेशन सेंटर में नियुक्ति तिथि चुनने के लिए कहा जाएगा। फिलिपिनो निवासियों के मामले में, आप इनमें से किसी एक VFS Global केंद्र द्वारा ड्रॉप कर सकते हैं:
अपनी वांछित आवेदन तिथि चुनने के बाद, अब आपको आवेदन शुल्क का भुगतान करना होगा। स्टैंडर्ड विज़िटर वीज़ा की कीमत £ 93 है और इसे क्रेडिट कार्ड से भुगतान किया जा सकता है। यदि आप एक लंबी अवधि के मानक आगंतुक वीजा के लिए आवेदन कर रहे हैं, तो फीस राशि के आधार पर भिन्न होगी। विभिन्न वीजा शुल्क के लिए इस पृष्ठ का संदर्भ लें ।
4. Prepare the required documents
वीएफएस ग्लोबल को प्रस्तुत किए जाने वाले दस्तावेजों को मूल प्रतियों की आवश्यकता होगी। इसके अतिरिक्त, आपको फोटोकॉपी का एक सेट भी प्रस्तुत करना होगा।
Here are the required documents you need to present for your application:
Passports and other travel documents
Current passport
Must be valid 6 months from intended travel date
Have at least two pages for the arrival and departure stamps
Previous passports (if any) for travel history
Photocopies:
Front and back of current and previous visas
Bio page of current visa
Valid and expired visas
Proof of income
Certificate of Employment
Income Tax Return
Proof of Financial Capacity
Bank Certificate
Employee Contract
Payslips from the last 6 months
Sample Itinerary
Provide a run-down of accommodations, activities, and places you’ll be visiting during your visit with corresponding date
Flight ticket reservation
If you’ve already booked both departure and return tickets, you may also include the reservation vouchers in your application
Hotel reservation
If you’ve already booked all accommodations for your trip, you may also include the reservation vouchers in your application
You can also pre-book some of your accommodations visa booking.com. Just find a accommodation that offers free cancellation and temporarily book it to present as part of your application. After, you may choose another accommodation if you change your mind once you have your visa!
Approved Leave Letter
This will help prove that you are currently employed and have reason to return to the Philippines
VFS Global Appointment Letter
After confirming your appointment, you will be sent a confirmation email. Print this out and include this in your application
Just to be sure, consider including these supporting documents in your application:
Details of travel history from the last 10 years
Details of your current residence
Parents: Name, Address, Birthday, Passport Number
Partner: Name, Address, Passport Number
Relative/Friend living in the UK: Name, Address, Passport Number
Details of Criminal Record and Immigration offenses
5. Submission of requirements and biom
आपकी नियुक्ति के दिन महत्वपूर्ण अनुस्मारक:
सुनिश्चित करें कि आपके द्वारा चुनी गई तारीख पर VFS Global केंद्र में कम से कम 15 मिनट पहले से होना चाहिए । प्रवेश प्रतिबंधित है और प्रति साक्षात्कार के समय में किया जाता है – इसलिए सबसे अच्छा हो जल्दी।
प्रवेश पर, आपको अपने व्यक्तिगत को लॉकर के अंदर रखने के लिए कहा जाएगा – जिसमें आपका सेलुलर फोन भी शामिल है। आपको केवल अपने आवेदन दस्तावेजों और खुद की आवश्यकता है।
है मूल दस्तावेज और फोटो प्रतियां का एक सेट अपने वीएफएस ग्लोबल नियुक्ति के दिन के दौरान प्रस्तुत करने के लिए तैयार है।
आपसे पूछा जाएगा कि क्या आप एसएमएस सेवा (P150-P200 के आसपास) का लाभ उठाना चाहते हैं जो आपको आपके आवेदन की स्थिति प्रदान करेगा। नकदी लाना सुनिश्चित करें !
बॉयोमीट्रिक्स (उंगलियों के निशान और फोटो) के लिए अपनी बारी की प्रतीक्षा करें
ठीक ढंग से कपड़े पहनें!
ध्यान दें : जब तक आपको ऐसा करने के लिए नहीं कहा जाता है तब तक ऊपर बताए गए सहायक दस्तावेजों में हाथ न डालें । हालांकि, आपके द्वारा तैयार किए गए अतिरिक्त दस्तावेजों का उल्लेख करने के लिए स्वतंत्र महसूस करें, बस मामले में।
6. Wait and collect your passport at VFS Global
वीजा प्रोसेसिंग में आमतौर पर 5 से 15 कार्यदिवस लगते हैं। हालाँकि, आप 3-5 दिनों के भीतर अपने वीज़ा को संसाधित करने के लिए P10,000 की लागत वाली प्रायोरिटी वीज़ा सेवा का लाभ उठाने का विकल्प चुन सकते हैं।
यदि आप एसएमएस सेवा का लाभ उठाते हैं, तो आपको एक पाठ प्राप्त होगा यदि आपका पासपोर्ट वीएफएस ग्लोबल में दावा करने के लिए तैयार है।
Additional Tips for applying for a UK Visitors Visa:
1. Gather your requirements early on
यूके वीजा आवेदन के लिए आवश्यक आवश्यकताओं को इकट्ठा करने में काफी समय लगता है। उस ने कहा, हम आपको सलाह देंगे कि ऑनलाइन आवेदन शुरू करने से कुछ सप्ताह पहले इन सभी को एक साथ रखना शुरू करें। पहले से इन तैयार होने के बाद भी परेशानी कम होगी क्योंकि आप अपनी नियुक्ति की तारीख का इंतजार करते हैं। अपनी नियुक्ति तिथि से पहले सभी आवश्यकताओं को पूरा करने के लिए जल्दी करने के बजाय, आपको सभी दस्तावेजों की दोहरी जांच करनी होगी!
2. Have as much supporting documents on hand
हालांकि इन सहायक दस्तावेजों की आवश्यकता नहीं है, वे हाथ पर होना अच्छा है। आवश्यक दस्तावेजों को जमा करने के बाद, कुछ आवेदकों से संपर्क किया जाता है और अतिरिक्त आवश्यकताओं में भेजने के लिए कहा जाता है – जो तब प्रक्रिया को और भी लंबा करता है।
उसी के साथ, हम अनुशंसा करते हैं कि आप उसी समय सहायक दस्तावेज़ों को एक साथ रखें जब आप आवश्यक लोगों को एक साथ खींचते हैं। हालांकि, अपनी नियुक्ति के दिन इन्हें आवश्यक दस्तावेजों के साथ जमा न करें। उन्हें एक अलग फ़ोल्डर में रखें और वीजा अधिकारी को बताएं कि आपके पास उस स्थिति में अतिरिक्त दस्तावेज हैं जो उन्हें इसकी आवश्यकता हो सकती है।
3. Do not indicate false information
यह बहुत स्पष्ट है, लेकिन यह अभी भी ध्यान देने योग्य है। वीजा प्रक्रिया के पीछे लोगों को कम मत समझना! वे बहुत सावधानीपूर्वक हैं और आपके द्वारा सबमिट की गई सभी जानकारी पर सवाल उठाएंगे। अपने आवेदन को पूरा करने के लिए खुद को समय दें और इसे जल्दी न करें!